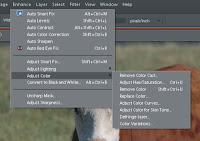
For the purposes of the exercise I am going to cheat a little here. We have returned to our picture of the cow but I have reduced the colour saturation and raised its colour temperature a fraction in order to demonstrate two of the nice colour adjustment tools in Elements.
 Click on Enhance and then "Adjust Color" (Americans will never learn to spell - sigh!). We see eight options on a new drop down menu. "Remove Color Cast" is a little superfluous if we used the eyedroppers in Adjust Lighting during the last exercise. In any event it behaves very much as an "auto" command, taking fine control out of one's hand. "Remove Color" is a crude black & white conversion tool which doesn't work nearly as well as the earlier "Convert to Black and White" tool.
"Replace Color" is a potentially powerful tool to manipulate particular colours within the image while leaving others alone. It can be fun to use but I have never been motivated to use it during real life post processing. "Adjust Color for Skin Tone" is also a potentially powerful tool which in practice I never use much, given that when other aspects of an image's exposure and colour balance have been dealt with, the need for it mostly goes away. "Defringing Layer" might be useful but I have never seen an application for it, thus far.
"Color Variations" is a fun way to adjust colour temperature, remove color casts and generally tinker. It offers lots of genuine fine tuning but at the end of the day is a much slower way to go about things than its alternatives. "Adjust Color Curves" looks at first glance as if it might be powerful but compared to the "Curves" tool in Photoshop and indeed Elements' own Levels control it's a bit of a toy really. There's more to be said about Adjust Color Curves ... but take my advice and don't bother with it.
 That leaves "Hue/Saturation" which potentially gives you almost complete control over everything to do with colour with the aid of calibrated sliders. In practice I'd recommend you concentrate mostly on "Saturation", for the most part limiting its manipulation between +/- 20. This facility also offers interesting coloration options for black and white images such as various types of sepia etc
Okay, lets bump up Saturation to +20 on our cow.
For some obscure reason the Elements' designers decided to hide a very useful tool in a very strange place. If you look at the top of the Palette Bin you see three edit tabs: "Full", "Quick" and "Guided". The vast majority of what we will do will be in the Full area but if you click on Quick and move your eye directly down the screen you come to the "Color" section with its immensely handy "Temperature" slider. All of the Quick controls are potentially useful but they lack proper calibration. There is no numerical value attached to your adjustments, disallowing reference points for use in more difficult images. Nonetheless I think the Temperature control is the BEST such tool in either Elements OR Photoshop for that matter. It almost makes RAW files redundant in their ability to "re-shoot" an image with a different white balance.
Sometimes a simple tool is the best and Temperature is a case in point. Slide right to lower the temperature of the image. Slide left to raise the temperature. Sometimes in order to go for particular effects, such as simulating sunset lighting, this tool is invaluable. Often the white balance control in cameras is inaccurate. This little tool can fix the problem. Brilliant. Take my advice however and underadjust rather than overadjust.
I can't give you a reference value (damn it!) but for our cow, lets lower the colour temperature just a smidge ... maybe a full tad. Mmmmmmmm ... I may have gone a bit too far, but you get the idea
In summary, the most useful colour adjustment tools are Enhance - Adjust Hue/Saturation PLUS Quick- Color -Temperature.
See my work at www.pbase.com/davidhobbs


No comments:
Post a Comment