The big problem with the Unsharp Mask is that while you DO get visual feedback about your sharpening parameter settings at the time of using it, you eventually have to commit yourself by hitting the OK button. Later, having stared at the image some more, you might easily conclude that you've overdone it, not gone far enough or got the balance of parameter values wrong for your display application. If you've saved the sharpened image you then have to revert to your sooc version (hopefully you DID rename the edited file) to begin the various edit steps again. If you haven't saved the sharpened image then you must go to the Undo History window, revert to the step before Unsharp Mask and re-do it. Then eventually you may change your mind again. Surely there's a better way - a way to fine tune your work as you go.
Here is a workflow approach to sharpening jpeg image files (and we ARE talking about jpegs) which largely solves the fine-tune problems and save a lot of time (and hassle) in the long run.
Ahem! The Hobbs Method:
Open your sooc image, determine that it is worth editing.
- Save it as a new filename, perform exposure, colour, cropping and any repair edits
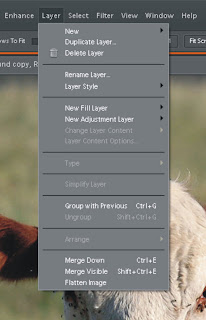
- Go to the "Layer" menu at the top of the screen and click on "Duplicate Layer"
- Perform a strong general sharpen (say) Amount 300; Radius 1.8; Threshold 3 OK
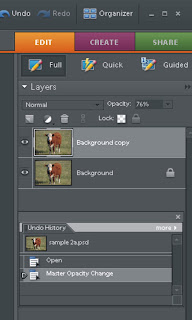
- Go to the Palette Bin Layer window and click the little down arrowhead next to "Opacity". A slider appears which monitors and fine tunes your sharpen from 100% back to zero
- When you are satisfied with the result, save it as a default .psd file
- Go back to the Layer menu and click "Flatten Image"
- Save the file as a jpeg.
 For a start we preserved the original sooc file - just in case. Secondly we saved an edited .psd file. Thirdly, we saved a completely finished, ready-to-use jpeg. Let us suppose that, later on, we decide that we got the sharpening wrong for our purpose in the jpeg and that we need to fix it. We COULD go to the sooc file but that means we have to redo all of the other edits, which (depending on the file) could take ages. Instead we go to the .psd file. Here we find that the duplicate layer is still in place, which allows us - using the opacity slider to quickly change the fine tune before saving a new jpeg. At worst we delete the original duplicate layer, do an entirely new sharpen run and fine tune again.
This is the best way I know to time efficiently edit a jpeg file while being able to quickly amend sharpening as needed for any purpose. At the same time we have been able to fine tune our sharpening in a way not normally offered by the Unsharp Mask.
 There may be some who are not certain what actually happened in the Layers jiggery pokery. When we created the Duplicate Layer, our subsequent sharpen was performed on that layer alone, leaving the original "Background" layer completely untouched. When the Opacity is set to 100%, all we can see is the sharpened image on top. As we progressively move the slider back toward zero, more and more of the sharpened overlay is progressively made transparent, until at 0%, it is completely erased, revealing the original unsharpened image. We just move the slider back and forth between "completely sharpened" and "not sharpened at all" until we feel the compromise is finally right. Coool!
Next time we'll look at the "Adjust Sharpness" command.
See my work at: www.pbase.com/davidhobbs

No comments:
Post a Comment