The vast majority of images which I edit, undergo four processes:
- Adjust Exposure/Contrast
- Adjust Colour Intensity/Temperature
- Adjust Composition (cropping)
- Adjust Sharpness
We have already dealt with the first two. Elements' excellent cropping tool is almost self explanatory but there are a few little points I'd like to discuss concerning it, another time. This article is about sharpening.
Virtually all camera sensors to date incorporate an anti-aliasing filter which is intended to lessen the potential effects of pixellation in digital images. One could understand its use in days of yore when resolution was always low but in this era of Nikon D3xs and Canon 5D mkIIs with 20 odd megapixels of resolution, one wonders why it is necessary to worry about anti-aliasing. Still, I suppose engineers (as opposed to marketing gurus) know best.
The point is that anti-aliasing filters deliberately blur images. If there was no sharpening of digital images at all, they wouldn't look very impressive. As it is, (unless you are shooting RAW files - and not always then) nearly all cameras perform SOME sharpening to images before you even see them. Let's be clear. Most "straight out of the camera" images have ALREADY been sharpened.
High pixel density point & shoot type cameras tend to sharpen images more than relatively low pixel density DSLRs. This is because it is assumed by the designers that p&s shooters won't want to be bothered with post processing at all and that the in-camera sharpening is the only sharpening that will ever happen. If you own a point & shoot/compact style camera I would strongly recommend that you go into your camera's menus and turn the in-camera sharpening effect down. Each make & model of camera will be different in this regard and it pays to experiment. The point is that if the original image is already a little oversharp, further sharpening in post processing will mostly serve to highlight whatever noise may exist in the image, create processing artifacts and produce prominent sharpening halos. Yuck!
Most often, while the sooc (straight out of camera) image may have received a slight degree of sharpening in-camera, it will still be a relatively soft picture, still requiring post process sharpening to look its best. Fortunately it is in the nature of post processing that adjustments like sharpening can be properly controlled and monitored - at least in theory.
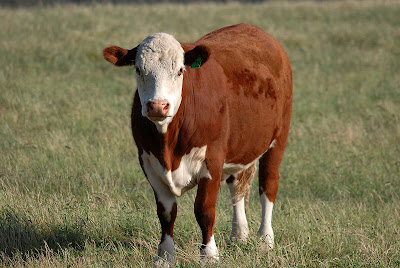
We return to our cow from the end of the last article which you should open in Elements. Go to the Enhance drop down menu. In the first section of options there is an "Auto Sharpen" tool which often works quite well. I want you to ignore it however because of the fact that it affords you no manual control and no opportunity to learn about the process. It fails to take into account how an image will ultimately be used. It effectively behaves like the original, dumb, in-camera facility. Let's leave it.
In the third section of options there are two sharpening tools. They are "Unsharp Mask" and "Adjust Sharpness". As it happens, both are excellent.
Unsharp Mask is the venerable Photoshop tool with the odd name. Explanations regarding how this tool was developed and how it got its name may be found in various places on the web so I won't go into that here. Let's just look at the classic dialogue box and examine the three parameters:
- Amount
- Radius
- Threshold
Simplistically explained, the Amount describes the DEGREE of lightening or darkening which takes place during a sharpening operation. The Radius describes the WIDTH of the area on either side of the edge which is affected by lightening/darkening. The Threshold describes the SIZE of an image area which the software will recognise as an edge in the first place.
Just for the hell of it. Let us enter the following values for the Unsharp Mask dialogue box by moving the respective sliders:
Amount: 300
Radius: 1.2
Threshold 3

Click on OK and there is our cow all sharpened. In the next article we shall examine parameter values in some detail.
See my work at: www.pbase.com/davidhobbs

No comments:
Post a Comment